Wednesday, December 27, 2017

Ecoprinting, part II

In addition to the ecoprinted scarves, I also tried dyeing some larger pieces of cotton and linen-cotton mix PFD fabric.  I ecoprinted with various leaves, and I also dyed some solids, all with logwood.  This time I let the bundles sit a good four days or so before checking the results.  Now I have the beginnings of a quilt on my design wall:


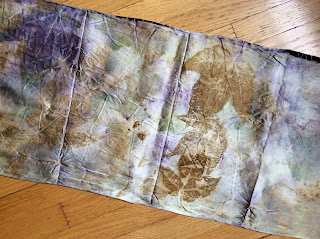
This was back in November, and as the weather got colder and more and more leaves dropped from the trees, I thought I was done for the season.  One day, however, I was walking in the neighborhood, and I saw a smoke tree in which the late season growth had produced enormous leaves.  At the October dye night with India Flint, one of the participants had mentioned to me that leaves from smoke trees made good prints.  I knew I had one more silk scarf blank at home, so I couldn't resist gathering some leaves and conducting one more experiment.  I made sure to dye my silk bundle just before an out of town trip, so that I wouldn't be tempted to open it prematurely.  Instead, it sat for more than a week, and the results were fantastic:


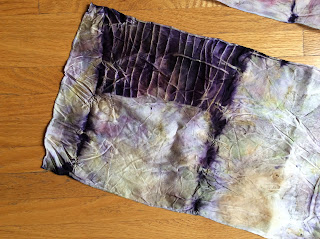
I laid the leaves onto half the scarf, folded the other half over, and rolled it all up.  Luckily, the ends were on the outside of the bundle, which meant that they took up more dye, and the string lines made a nice pattern, as shown in the first photo.  I rolled the bundle around a piece of PVC pipe in order to maximize contact between the leaves and the silk, as well as to minimize wrinkles and achieve more consistent results.  It was thrilling to see how beautifully the leaves printed.  The remains of the original leaves were like tissue paper in the end, which also suggested just how well the pigments from the leaves transferred to the fabric.

I made just one error: the printing on the PVC pipe also transferred to the fabric.  D'oh!


Fortunately, the numbers are on the back side and right in the center, so they're at the back of my neck when I wear the scarf.  Next time I'll make sure there's a layer of scrap fabric between the pipe and the silk.

I hope I'll be able to report progress on the quilt over the next few months.  I'm planning to use some of the silk scarves from my previous round of dyeing, in addition to the cottons and linen-cotton mix fabrics.  I need to interface the silk, and then I can start playing with it.

Happy holidays, and happy sewing!

Wednesday, December 20, 2017

Ecoprinting with logwood, and yes, I'm still alive

I've now managed to go more than a year without posting, despite, or perhaps because of, a diverse array of fiber-related adventures.  I'll try to catch up a little bit, starting with more recent endeavours and then working my way backwards.  Apologies for the photo quality, but part of laziness means taking photos with an iPad and not doing any editing.

At the end of October, I had the good fortune to enjoy an evening of ecoprint dyeing at Maiwa with India Flint.  She introduced the group to the basic technique of bundling leaves or other plant material into a piece of fabric and then steaming or immersion dyeing in order to transfer plant pigments onto fabric.  The workshop moved too quickly to get much in the way of actual leaf prints, but I ended up with a nice silk scarf dyed in a range of amber browns from the eucalyptus leaves and branches that we used in the dye pot.

Afterwards, I bought some alum, gallnut tannin, and logwood chips and experimented over a period of several weeks. Using Maiwa's natural dye instructions, along with miscellaneous other sources, I mordanted some silk scarf blanks and applied both tannin and mordant to some cotton and linen-cotton mix fabrics.

For my first dye session, I gathered all manner of fall leaves:


I had asked India about using fig leaves, and she suggested soaking them in iron water first, which is why those leaves are in a bucket, along with a few leaves from our backyard smoke tree for good measure.  The other leaves, which came from various spots in the neighborhood, I used as is.  Here's how things looked after layout, bundling, and dyeing:


I managed to wait about 24 hours before unwrapping.  Here are some of the results:


The Japanese maple prints didn't stay red--they faded to a light caramel brown after washing.  Meanwhile, the fig leaves in iron water (underneath the top scarf, on the lower part of the photo) didn't print very clearly, but that scarf ended up with an interesting yellowish cast that the other scarves lack.

The best results came from a heavier weight silk charmeuse scarf:


I don't know how or why, but some of the leaves printed strongly with a beautiful gold-bronze, and there are all sorts of green splotches in addition to the purple tints from the logwood, and gold-browns from the leaves.  The charmeuse seems to give everything a remarkable pearly sheen.  I've pressed the scarf properly since taking these photos.  I'll cut up the other three scarves for fabric, but this one is worth wearing.  It's not the most sophisticated example of ecoprinting, especially since I didn't think about how I was bundling--hence the rectangular-ish purple block in one corner.  But it's not bad at all for a first solo outing.

More soon!

Tuesday, December 13, 2016

More block printing!

Inspired by Lysa Flower's great block printing workshop, I splurged on Speedball fabric inks and other supplies, and I spent some time carving additional blocks and printing with them on fabric.  Here are the blocks that I've cut thus far:


A couple of these are variants on my workshop blocks.  I recut the hexagon to try and avoid a few nicks in the original, and I did a new, improved version of the scattered leaves in the hopes that this one would print with better registration.

The orange peel block prints nicely:


It also pairs beautifully with the block of narrow straight lines:


It was fun to try combining a couple of the different leaf blocks.  I love the clean-looking red and white print here:


The new leaf cluster block registered pretty well, but I didn't mark any particular guidelines.  As a result, by the time I worked my way around to the lower right corner, I ended up with a bit of a mismatch, as you can see above.

The other leaf blocks also work well together:


Based on some advice online, I tried using carpet tape to mount my blocks onto some cheap acrylic quilt templates, so that the printing would be easier.  That worked well the first time, but I think that when I washed the blocks afterwards, it weakened the adhesive.  As a result, the blocks started sliding off the acrylic when I used them a second time, and the registration wasn't as precise as I wanted it to be when I tried printing the leaf clusters again:


The registration isn't actually too bad, but it's a little bit off, and I think I can do better.  I didn't try printing the new hexagon block, because I want to make some registration marks first, and I was too lazy to do it during this past round of experiments.  Now I think I'll wait until warmer weather in the spring when I'll be able to work outside.  The fabric inks are oil-based and smell like hell, and they need to cure for about a week until the odor goes away.

I wanted to save the best for last.  Here's the horizontal line block, printed in red on gray.  It makes a stronger impression in person.  I love the mid-century modern look here, so simple yet so dramatic:


Happy crafting, everyone!

Sunday, December 11, 2016

Block printing!

As I mentioned a few days ago, back in early October I took a block printing workshop with the fabulous Lysa Flower.  In addition to being a VMQG member, Lysa is a graduate of the Emily Carr University of Art and Design and a working artist and fabric designer, and she gave us a jam-packed day to explore the joys and possibilities of block printing.   


We started with an introductory design exercise, in which each of us received a random card with some directives.  I think mine were something like "hexagons," "small scale," "random repeat," and "narrow spacing," and I came up with the block on the lower right.  Everyone did multiple test prints on construction paper, so that we all took home different samples that illustrated principles of scale and placement.

For our second block, Lysa introduced the class to methods for registration that involved drawing a basic design on paper, cutting the paper in half and taping it back together with the cut edges on the outside, adding more details, and then cutting again in the other direction and re-taping.  It sounds complicated when described, but is easier to understand with pictures, as in this online tutorial.  Leafy shapes are among the few non-geometrical objects that I can draw reasonably well, so I carved the block on the lower left.  Then, in the late afternoon, I had just barely enough time for a hexagonal design that I had in mind before the workshop.  I think it's an Islamic tiling pattern--I knew it would tessellate and make a great block for printing.

Here's how the fabrics printed with the second and third blocks turned out:


The Moo carve block that I worked with for the leafy print wasn't exactly square, so it didn't register as precisely as I would have liked.  I learned the hard way that the carving materials aren't cut all that carefully by the manufacturer!  I also decided that I prefer to work with the black Easy-Cut material.  The white, eraser-like stuff tends to be a bit more crumbly.  Although the black Easy-Cut is a little harder to carve, it allows for sharper lines, and I think it will hold up better in the long run.

I did a lot more block carving and experimenting in the weeks after the workshop.  More soon!

Sunday, December 4, 2016

Happy sewing, in dark, gloomy days...

Between two months of dark, rainy weather and a long-deferred photo-editing software upgrade, I've stayed away from blogging.  Here's Poppyprint's comment on October's weather, and November wasn't significantly better.

Remember the indigo medallion quilt I was working on a while back?  In mid-August, I took the scraps and pieced tops for two small wall quilts.  Here's how things looked back then:


Although I haven't been blogging, I've had a reasonable amount of time for fabric-related activity this fall.  In particular, October was a fun, fiber-filled month: block-printing workshop with VMQG's fabulous Lysa Flower, mid-month quilting retreat, and a katazome workshop at Maiwa with the always-inspiring Akemi Nakano Cohn.  I've also started sewing some clothing for myself, to start dealing with the fact that I hate all of my old clothes right now, but don't particularly want to go shopping either.  I'll try to take some photos of the results the next time the sun comes out, but for now, I'll just say that although I haven't been as active in the sewing room as I had hoped over the past few months, a few things have gotten done here and there.

Among the finished projects was the first quilt above, "Stray Thoughts," which I actually completed back in September but didn't get around to photographing until today:

 
"Stray Thoughts" is now listed in my Etsy shop.  I also made a few pouches back in October, and they're finally going into the shop as well.


Happy sewing!

Saturday, August 27, 2016

Modern Quilt Showcase, Vancouver: Today and Tomorrow Only!


I'm posting at the last minute here, but in case you're in Vancouver this weekend, please head over to VMQG's first-ever quilt show, our "Modern Quilt Showcase," over in North Van at the Pipe Shop (and no, that's not where they sell pot paraphernalia; it's a former industrial site turned public space).  We'll have over a hundred quilts by guild members on display, plus an education/demo area at our "Modern Mini" exhibition.  Four of my quilts will be there: "Indigo Summer," "Quilt with Attitude," "Drama Adorno," and "Oakshott Lattice."

The Pipe Shop is easily accessible from Vancouver proper.  From Waterfront Station in downtown Vancouver, you can just take the ferry over the Lonsdale Quay and walk from there.  Once you arrive at Lonsdale, cut through the public market, jog over to the right, and you'll find your way without too much trouble.

I'm planning on heading over this afternoon, so maybe I'll see you there?

Saturday, July 30, 2016

Done!!

It's taken me a lot of weekends, but the new bed quilt is finally finished!  It's a big one, close to 90" square:


The binding features a faux piping that I learned at a VMQG meeting a while back:


I wasn't confident enough about my FMQ skills to use a more visible thread on the border, but I like how it came out:


Now what do I do?  Cheers!

8/2: Technically, this isn't a WIP, but I'm still posting to WIP Wednesday on The Needle and Thread Network.  Gotta show off!