Thursday, June 26, 2014

The day after

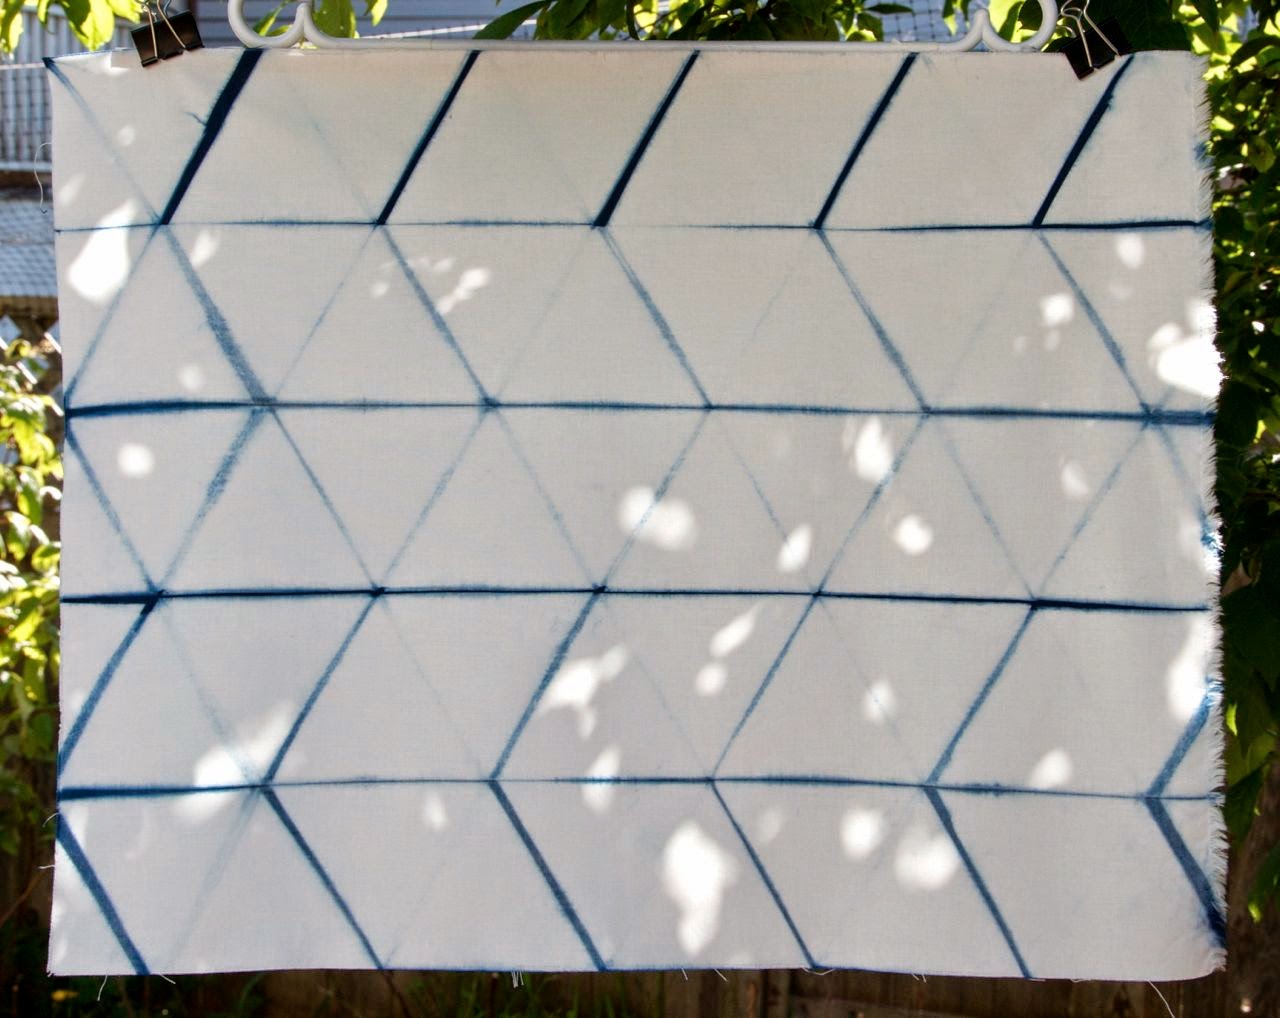
Here are a few photos of my fabrics oxidizing the morning after yesterday's big dyeing session:


Despite an eventful start, this round went really well.  The craziness came when I learned why you should always wash your stock solution jar after the end of a dyeing session.  I didn't bother, because I figured that glass is non-reactive, and the stuff left in the jar might be good for the next go-around.  But I had a real surprise yesterday, after I set my jar of stock solution in a bucket of warm water to reduce.  After about 45 minutes, I went to check how the stock was doing.  When I lifted the jar, the dye solution stayed behind in the bucket!  The solution just ate through the bottom of the glass and left the jar in two pieces.  I can only guess that the residue from the old dye stock weakened the bottom of the glass, and the new solution just put the jar out of its misery.

I had read that something like this could happen, but not really believed it.  Now I'm worried that the old solution that sits in my vat between sessions is going to eventually eat through it as well, since I also read that that can happen to stainless steel.  The pH in the vat is significantly lower than that of the stock solution, so the stuff in the vat shouldn't be nearly as corrosive, but even so, it's cause for concern.  I read that heavy-duty plastic garbage bins are stable long-term, so from now on, I'm going to try storing my exhausted solution in a garbage bucket in the back yard.

Meanwhile, the diluted stock solution in the bucket looked good, so I just bailed a gallon of old, exhausted dye from my vat and went ahead.  The vat might have been the best that I've made thus far: it seemed very lively, with a lot of bubbly flower.  Possibly it was a little overreduced at first, but by my second round of dipping, everything came out of the vat a beautiful bright kelly green, which I've come to think is the sign of a good vat.

I'll say more about the highlights of yesterday's session in future posts, after I've washed, rinsed, and ironed all of the fabrics.  The short story is that I'm really pleased: the nui shibori pieces came out beautifully, especially my two attempts at shirokage (white shadow) dyeing, and I also worked hard at manipulating my fabrics in the vat, in order to improve dye absorption.  I did have one other problem--bits of gritty gunk kept showing up on my fabrics.  Fortunately, it brushed off easily enough after the first round, but I'm not sure what it was.  Sludge, perhaps, left over at the bottom of the vat from the previous session?  Or was it related to the corroded glass from the stock jar?  Could it have been little bits of whatever you get after sodium hydroxide (lye) eats away stainless steel?  I think the first possibility is more likely, in which case I'm going to have to start putting some kind of grating or something in the vat, to keep fabrics from touching the bottom.  Storing the solution in another container and cleaning the vat between sessions should also prevent this problem.

The adventure continues!

Tuesday, June 24, 2014

"Eat, drink, and be merry, for tomorrow we dye"

It's been a busy week of scarf-making, quilt piecing, and dyeing preparation.  The forecast for tomorrow and Thursday is looking good, so assuming the weather holds, I will be back at the indigo dye vat early tomorrow morning!  In anticipation of the great event, I've been busy prepping nui shibori pieces.  At VMQG's recent sew-in on Sunday, I spent most of my time stitching and pulling threads, and I've continued since then as well:


In quilting news, I drove across the border Saturday morning to pick up the Kona grays that I ordered, and happily the darker of the two was the one I needed, and I've been able to resume work on my MQG challenge quilt.  In this case, "M" is for match:


For my Etsy shop, I continued sewing infinity scarves and have a bunch of new ones that are nearly ready for listing.  In a new twist, I came up with the idea of inserting a knot as a decorative detail:


I didn't anticipate the knot's versatility, but it happens to offer all sorts of stylistic possibilities, depending on how tightly it's pulled or how the knot is shaped.  To see some of the variations, please feel free to click this link to my scarf listed at Momiji Studio on Etsy.  

I'm linking up to WIP Wednesday on Freshly Pieced and The Needle and Thread Network.  Now off to bed, and dreams of indigo dyeing!


Wednesday, June 18, 2014

50 shades of grey?


I made significant progress on my MQG challenge quilt this week and am about to begin working on the second side (no photos, because I'm keeping the overall design secret until VMQG's July 21 guild meeting).  I also hit a roadblock, however, because I'm running out of the gray Kona cotton fabric that constitutes the main background for both sides of the quilt.  When I started this thing, I thought 1-1/2 yards would be plenty, but it's not even half of what I need for my two-sided quilt, plus the binding. 

I immediately headed to the nearest LQS that carries the full line of Kona solids, only to find that they're out of the matching gray.  Kona Ash, which was in stock, offered the closest alternative, but it's a little too yellowish.  Of course, I can't remember exactly which gray I bought in the first place, and the person manning the shop that day couldn't find the latest color card, so I had to resort to online guessing.  Fortunately, Kona doesn't actually come in fifty shades of grey, but there are still more than enough possibilities to make things difficult.  I can't be entirely sure, but I've narrowed down the choice to two: Kona Shadow and Kona Silver.

I called around, but one LQS is about to go out of business and hardly has any Kona solids left, and the other two fabric shops that I telephoned don't carry Kona solids.  Sorry, LQSs--I tried!  What's a quilt maven to do, other than buy both grays online and hope one of them is the right one?  I had difficulty finding a Canadian dealer that carries both, plus I don't want to wait for Canada Post, because I'm on a deadline.  Sorry, Canadian fabric shops--blame our slowpoke postal service!  Instead, I ordered 3 yards of each gray from a U.S. dealer and will drive across the border to pick up the fabric.  Fingers crossed that the package will arrive by Saturday.

In the meantime, I also returned to sewing for my poor, neglected Etsy shop.  I found great infinity scarf instructions online, learned how quickly and easily the scarves come together, and on Sunday, I immediately whipped out five in a range of kimono silks:


Last night, I finished number six as well.  The key, which I didn't know when I first tried to make cowl scarves a few years back, is not to sew all the way to the ends when making the fabric tube.  That makes it a lot easier to join the ends that close the circle.  Voila!  I'm going to keep churning these out, because they're fun to make, and they're beautiful.  What's not to like about that?

The weather is on the cool side, and I haven't had time for the necessary fabric prep, so no indigo dyeing today, alas.  I've got my eye on Monday or Tuesday next week.

Linking up to WIP Wednesday on Freshly Pieced and The Needle and Thread Network.  Cheers!


Thursday, June 12, 2014

You know you're obsessed with indigo dyeing when...


You know you're obsessed with indigo dyeing when...

1) You smell the cats' litter box and wonder if you can extract the urea from the clay and use it as a reducing agent.

2) You look at the plastic hose attached to your hand-held shower head and think it might make a good resist for tesuji.

3) You start trolling the internet for a hundred-quart or larger stainless steel kettle to use as a dye vat.

4) You consider trying to cultivate indigo or woad in your backyard.

5) You imagine that it wouldn't really be that hard to install running water, heat, and industrial grade ventilation in the garage, so that you can turn it into a year-round dye studio.

6) You decide there's no better reading in all of world literature than the entry on "Dyeing" in the 1792 edition of the Encyclopedia Britannica.

7) You do your first stoichiometric calculations in almost 30 years and start pricing pH meters and balances accurate to 0.001 g.

8) You stay up past midnight because you found an article in the Indian Journal of Fibre & Textile Research on the chemical conditions for dyeing synthetics with indigo.

9) You watch Youtube video of a shibori craftsperson tying bazillions of tiny kanoko knots at lightning fast speed and think, "That looks like a good idea."

10) The following sentence makes perfect sense to you: "I'm not obsessed with indigo, I just can't think about anything else."

Feel free to comment and add to the list!


Tuesday, June 10, 2014

Tesuji tote bag: WIP Wednesday


I'm in desperate need of a new tote bag, because the straps on the old one that I made 6-7 years ago are completely shredded.  I therefore dyed last week's tesuji fabric with a new tote in mind.

Before getting to the bag, here's how the dyeing process worked. I pleated lengthwise with fairly narrow pleats--about a centimeter wide or so.  The pleating is easier if you spray the fabric lightly with water, and also if you clamp it periodically with binder clips.  (Of course, I didn't figure that out until after I had pleated the first tesuji piece.)  The pleats don't need to be exact--quite the opposite, since you want the happy accidents that arise from randomly scrunched up bits of pleating.

After I was done pleating, I used cotton kitchen twine to bind the pleated fabric, on edge, to a length of polypropylene rope:


You can also just bind the fabric without the rope, which is how I did my other tesuji piece, but I prefer the rope resist.  It's easier to bind, and I also got some beautiful secondary patterns from the rope itself.  The string should be wound around quite tightly, so it helps a lot to wear gloves while binding the fabric to the rope.

The tied fabric went through several rounds of dyeing and oxidating before I untied it.  It was so exciting to see the pattern for the first time upon unbinding!

The unbinding begins!  Note the resist lines from the string and the secondary pattern from the rope on the back side.
Fanning out: It was so thrilling to see the full pattern for the first time!

Fully unwrapped and undergoing the final round of oxidation
Close-up: The final result, after washing and ironing
I'm sorry that I don't have full step-by-step photos, but I hope the process is clear enough from what's here, if you want to try it yourself.  At least the photos provide a sense of how the combination of pleats and twine create such an elaborate pattern.  With any luck, you can extrapolate how, by sort of crushing the pleats a little as you bind, you get a mix of interesting zones exposed directly to the dye, along with well-resisted areas in the valleys of the pleats. 

There's also a good description, with diagrams, in Yoshiko Wada et al., Shibori: The Inventive Art of Japanese Shaped Resist Dyeing, pp. 104-06.  The book also has instructions for a wide range of other pleated resists, some of them incredibly elaborate.  For this method here, the pleats don't really have to be as narrow as on this piece--I'm going to do wider pleats on my next tesuji sample.

Today I paired my tesuji fabric with blue denim and made the tote:


Unfortunately, the new bag isn't as good as the old one.  The denim I had was too lightweight, so the bag is on the floppy side, and the straps aren't as strong as I'd like.  Won't be hauling a lot of groceries with this one!  Oh, well--I can use the bag for light errands, and I'll just have to get some heavyweight denim or canvas and make another tote for big jobs.

Meanwhile, our glorious, summery weather has been replaced by the Vancouver norm: cool, gloomy, and rainy.  The forecasts for the next seven days aren't so promising either, although if the current predictions hold, maybe I can try another round of indigo dyeing on Wednesday next week.  The wait is okay, since I really need to put in a lot of hours on my MQG challenge quilt--I've got less than six weeks to get it done in time for my guild's July meeting!

Linking up to WIP Wednesday on Freshly Pieced and on The Needle and Thread Network.  Cheers!

Tuesday, June 3, 2014

Back to the vat

I did another round of indigo dyeing over the weekend, with what ended up as the "yes, but" vat, as in yes, I like many of the results, but at the same time, things frequently didn't turn out the way I had imagined.  First of all, the vat itself was actually rather frustrating.  I wanted to use less indigo and get lighter blues in the initial dips, but still get a gradation to dark blue by the end of the day.  I didn't cut back on the thiox (the reducing agent) enough, however, so the first three dips resulted in pretty much the same pale blue.  I managed to fix that problem with more stock solution in a different formula, but that meant it was mid-afternoon before I started getting a decent range of shades.  In essence, I was starting over again after about four hours of hard work.  Even so, I couldn't get more than a deep medium blue after 8-10 dips.  The vat started fading around 6:30 p.m.  I tried recharging with a bit more thiox, which seemed to help, but in the end I'm not sure if the problem was insufficient reduction or just not enough dye left in the vat.  Or maybe with the lower concentration of indigo, I just needed to keep going up to 15 or 20 dips, or even more--I just don't know.

On the plus side, I improved my itajime technique.  For the pieces in which I wanted a lot of resist, I clamped more tightly than before and got some beautifully sharp contrasts with relatively little dye running beneath the acrylic resists:


On the but side, when I unfolded the half-square triangle piece, I wasn't careful enough.  My rubber gloves had some reduced indigo on them and left finger and thumb prints:

Glove print: d'oh!
I also worked on better dye penetration in several of the itajime pieces, so that I could get more dye absorption in between the folds:


Contrast those with the "windows" pattern that I tried, but without any extra effort to promote dye penetration:


This nui shibori piece didn't end up with the feathery look that I expected, but it's still attractive:


Indeed, the above FQ is probably the best piece of the day.  I did an extra two quick dips (two minutes each, with 10 minutes oxidation in between) at the very end of the evening, and that was just enough to provide a little bit more of a boost to the darkness of the indigo.  It's a richly colored and striking piece of fabric.

Both tesuji fabrics also turned out wonderfully, although a shade or two lighter than I would have preferred:


I love how the chevron fat quarter of nui shibori turned out, but the mokume (wood grain) piece didn't work as well:


My stitching was too regular on the mokume sample, and the stitches were too far apart, so it looks more like pleats than the wood grain pattern that I wanted.  More even coloration in the solid parts would have been nice as well.  At least the colors on both pieces are what I was aiming for: light blue on the chevron piece, and a light medium blue on the mokume.

Finally, I also tried to get a gradation of 8 solids, 3/8 of a yard each:


It's not too bad, but the final pieces never got as dark as I would have liked, and there's hardly any difference at all between the final two or three.  As I said before, I don't know whether the problem involved reduction or the amount of dye that was left.  I also somehow managed to get some dye spots on the lightest piece--maybe bits of flower--grrr.  The colors are more mottled than ideal as well--perhaps these pieces are too large for my 5-gallon vat, or maybe wringing the fabrics out upon withdrawal from the vat is producing the uneven coloration.  But the good news is that there wasn't too much dye run-off during the rinsing process, so this round of fabrics has a high degree of color-fastness.  And the gradation, while not across as large a range as I wanted, is still rather nice on its own terms.

In short, this most recent spate of indigo dyeing was somewhat of a mixed bag as far as the actual dyeing process was concerned.  But once I got my fabrics rinsed, dried, and ironed, they made me really happy.  Isn't fabric funny that way?

In the quilting department, I did make progress on my MQG challenge quilt (no pictures this week) and have started piecing my letters together for the first side of the quilt.  Did I mention that it will be two-sided?  

Linking up to WIP Wednesday on Freshly Pieced and The Needle and Thread Network.  Happy sewing!